Monday
Bulkheads
We have bulkheads over our kitchen cabinets. For years we've said that when it came time to renovate the kitchen we'd take the bulkheads out and make the cabinetry as tall as possible to maximize space. Fast forward to this past weekend and my Mom casually said, "Are you sure there are no heating ducts behind the bulk head?" Yikes. We totally forgot to check. So this afternoon Aubrey took out a drywall cutter and of course I took a video. :)
Sunday
Peony in Bloom
We have a beautiful tree peony right by our front door. It is heavenly in spring when it blooms!


There are six blooms on it right now and all of them are huge!

Just a few days ago one of the buds looked like this.

What a difference a few days make.
Peonies were my Mom's favorite flowers, so it always touches my heart to see these. She would've loved them!
Thanks for your visit.
Pam
I am linking to the following parties:
I am linking to the following parties:
Friday
Delicious and Easy Artisan Bread
I saw this picture on Pinterest and knew I had to check it out.
Janet @ Simply So Good shared this amazingly easy recipe.
Delicious bread using only 4 ingredients!

You'll need a cast iron dutch oven with a lid. I immediately logged on to Amazon and ordered this 7 quart one. You will need one that is at least 5.5 quarts for this recipe.


Janet uses a LeCreuset for her bread. I'm not in her league as a cook, so this cheaper cast iron pot is fine for me.
I did wash it and wipe it with vegetable oil first, as that's what the manufacturer recommends for this dutch oven. Janet does not put any oil or sprays or anything in her LeCreuset first.
You'll only need 4 ingredients:
3 cups All Purpose Unbleached Flour
1 3/4 teaspoons salt (Janet used Kosher salt, so I did too!)
1/2 teaspoon yeast


Whisk those together in a large bowl
Add 1 1/2 cups water, mixing together with a rubber spatula
When it's all mixed, put plastic wrap over the bowl and leave it on the counter for 12-18 hours.
(this is what it looked like this morning after 14 hours)

Preheat your oven to 450 degrees
Once it's at 450, put your dutch oven with the lid on in the oven. Leave it in there for 30 minutes.
Take your dough and put it on a heavily floured surface. I used my pastry cloth with way too much flour. :)

Shape it into a ball. It'll lose some of its size, but don't worry. Put the plastic that you had over the bowl over the dough until the cast iron pan is ready.
BE VERY CAREFUL when you pull the
dutch oven out. It's HOT!
Lift the dough up (without the plastic!) Put some flour on your hands as it'll be really sticky. Set it in the dutch oven. Put the lid back on and put it in the oven for 30 minutes.

Here it is after 30 minutes:

Remove the lid and cook for another 15 minutes.
I was afraid it might stick, but it popped right out.
Leave it on a cooling rack for a few minutes.

We could only wait for about 10 minutes...

It was DELICIOUS!
I will definitely be making this again; in fact, I will probably prepare another batch tonight!
Please go to Janet's blog to get lots of ideas for different ways to make it.
Thanks to Janet for the recipe and great tips and thanks to you for your visit!
Pam
What didn't get blogged

1. Leigh-Ann came over Monday and we talked about kitchen designs and more fun stuff. It's nice to have a sounding board of someone who is involved in the design world!
2. Aubrey, Oscar and I headed back to Ikea to tweak the design a little bit and make sure it's all good. The kitchen team at Ikea rocks my world. They are really, really helpful.
3. Oscar is all about "snuggles" and riding on Aubrey's shoulders.
4. We had an afternoon at the Beach - we're lucky to be walking distance but on this day we drove down and parked, which allows us more time down by the water.
That's it! Have a great weekend. I'll be in my kitchen staring at tile, counters, and cabinets. :-)
xo Lindsay
Oh dear.
 My friend has the subway tiles from Home Depot installed in her laundry room & last night she suggested we hold up the Ikea door up to the tiles to see how it looked. Oh my. I'm a bit baffled at how it can look ok on my kitchen table laid out but when I see it like this, the door looks VERY yellow. I do appreciate that the lighting is different than in our kitchen but the significant difference in colour is bothering me.
 So here is where I'm at now. I have three options. 1. I'm can find a different backsplash that isn't white subway tile 2. I consider painting the Ikea cabinet doors a brighter white or 3. I could assume that my cabinets with the Home Depot tile will look different in my house than it does in her basement. Well, it's back to the drawing board for a little bit to work through this.
Wednesday
Two new counter options

If you've followed along the kitchen process you'll know that I'm in love with the look of Carrera marble for our counter tops, but after a lot of research, Aubrey and I decided that marble isn't right for our house. Which meant the hunt was on to find a counter that will give me the look of carerra marble but without the stress. The substitutes are no less expensive than marble but much more durable, more resistant to stain, and less upkeep.
Originally I was almost certain that we'd be going with Cambria in Torquay, but after last weekend when we placed the tiles/counters/cabinet together, I realized we needed to play closer attention to the different tones of white to make sure that the Ikea Adele looked as close to white as possible. Although part of the problem was resolved by switching out the tiles I wanted to make sure we tried every combination of counters to make sure we're going wit the right one.
So today, new countertop samples in hand I broke it down to the following contenders. Ceasarstone in Misty Carrera, Silestone in Yukon Blanco and Cambria in Torquay. So, I'm debating which goes best with the white subway tile and the Ikea Adele cabinets.

So here are two new contenders that I have yet to show you. Caesarstone in Misty Carrera and Silestone in Yukon Blanco....


Thoughts? I now know how the Bachelor feels on the final rose ceremony. How does one pick? *sigh*
Tuesday
White Subway Tiles, a story of two shades

The main puzzle piece that isn't going to change in our kitchen is the cabinetry, Ikea's Adele Door style. I don't want to give up on Ikea as #1. It is really affordable and #2. I like the door style - a classic Shaker. Also, after seeing a lot of beautiful (white) Ikea Adele Kitchens, I figured some small puzzle pieces could potentially change, in order to make the cabinets (one of the bigger expenses) work.
And although it has been proposed that finding a different backsplash could work, I really love the classic look a subway tile gives. The subway tile I showed yesterday as I mentioned was the subway tile from when we did our washroom renovation in the basement. We found the brightest white subway tile around for that shower. Without thinking, I assumed that the brightest white subway tile from the washroom was going to be the same tile for the kitchen. But as you saw in yesterdays post, the brightest white tile made the Ikea Adele cabinet appear yellow. Bleh.
So last night I zipped over to The Home Depot and picked up three white subway tiles and brought them home. This morning in daylight, it was evident that the Home Depot tiles were better as they made the Ikea Adele cabinetry less "yellow". As I stare at the computer monitor I wonder if you can see the difference. Sit back a little and book at them. I assure you, they are different. :) So we've solved that! We'll go with the Home Depot subway tiles. Next up, counters. ;)
Monday
Kitchen Elements
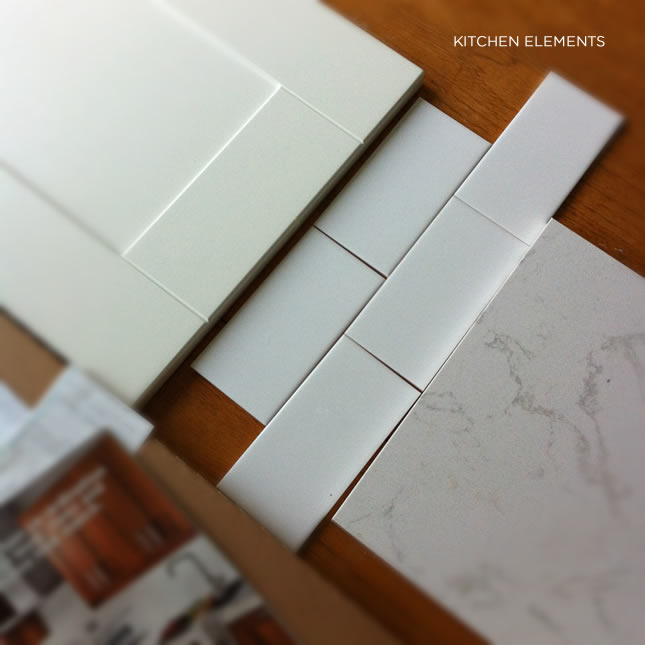
I picked up an Adele cabinet door from Ikea, and matched it next to white subway tile (left over from our basement bathroom reno) and next to that, the quartz countertop Cambria Torquay. Each in their own right is perfect, but when I placed each beside each other the Adele door suddenly went very off white. I'd like to avoid painting the door, so I'm wondering if it's the counter top that needs to change. Anyhow, just a snapshot from my kitchen table right now. :)
Inspiring weekend...

I find that the business side of my career sometimes takes over - responding to e-mails, stock, ordering supplies, shipping orders --- that all of the sudden I feel that I've neglected the creative side. Although I have no shortage of creative outlets (renovating and decorating our house is keeping me very entertained), I sometimes miss the "designing" part of owning a design studio. On the flip side, one of the nicest feelings is when fully absorbed in administrative tasks when all of the sudden I'll see something that sparks some creativity. What happens next is a whirlwind of excitement as ideas start flowing. That's what happened with my new line of stamps for my shop that arrived on Friday and I spent the weekend photographing. I've shown the stamp used on my itty bitty drawstring bags, hang tags, and my mini cards. Anyhow, that is it. Just showing you what happened when I got inspired! xo Lindsay
Sunday
Ladder for the Garden
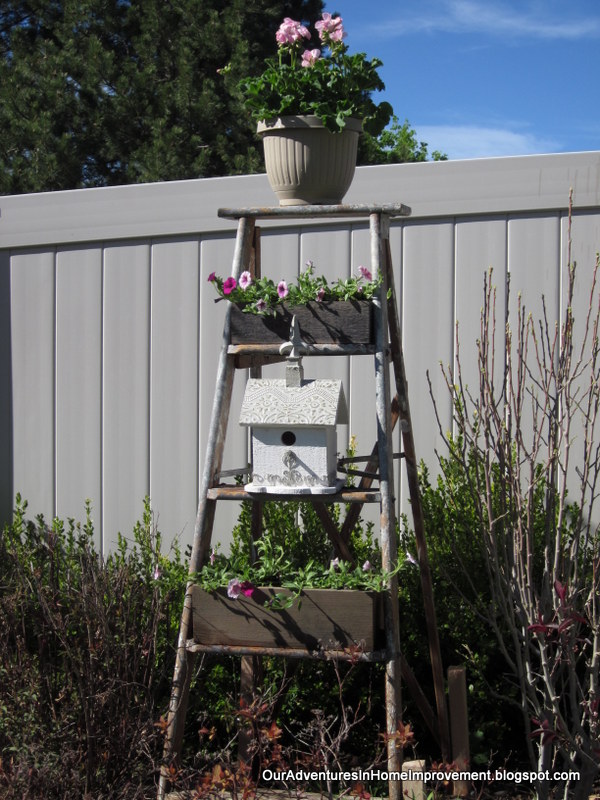
Last fall I found this ladder at a garage sale for $1 (!) Since it was so late in the season, I left it in the garage until today.

We started by making boxes out of fence boards for two of the shelves.

My trusty aging technique of Apple Cider Vinegar and Steel Wool made them look older within an hour. Directions for this process are HERE


We secured them to the ladder and added drainage holes to the back where the box wasn't resting on the ladder step. (you can see here how different the box looks just one hour later)

You may remember my post last December about the 93mph winds here that blew 60' trees down. I don't anticipate winds that strong again anytime soon, but we do live right by the mountains and get windy days. I put 24" stakes in and we secured the ladder to them. You can see them right now, but once everything starts blooming, they will not be seen.

I know it's early to be planting annuals, but I'm keeping my fingers crossed that we don't have too many freezes from now on. I planted these wave petunias in the boxes.


We secured this birdhouse to the center step.

And the potted geranium on top. We'll see if the geranium is a keeper as the season goes on... Right now I like it, but may change it later. :) I didn't put anything on the bottom step because it'll be hidden very soon when the spirea in front starts blooming.

I'm excited that there are daisies and coneflowers underneath that should envelope the bottom of the ladder soon. I'll be sure to take more pictures as everything comes back to life.
Thanks for your visit!
Pam
I am linking to the following parties:


